"The Chromatic Scale is the alphabet of the language of music."
All Hail The Chromatic Scale
The Chromatic Scale is the alphabet of the language of music and if you don't know how to play one, you don't know nuthin' about the guitar. Check out Scotty's video guitar lesson The Dumb Machine to learn more.
Music is a language and your guitar is a typewriter that types that alphabet. Before you can really make any sense of your fretboard or understand any of Scotty's scale and chord finger charts, you have to learn to type the musical alphabet on your guitar.
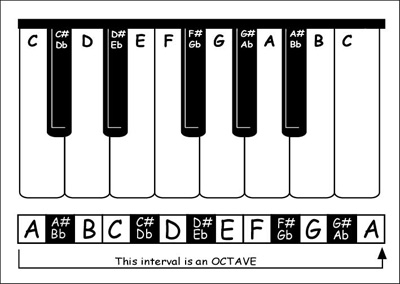
Despite what others might have told you, the musical alphabet has 12 units in it. Just look at a piano keyboard. How many keys are there before they begin to repeat? The answer is 12 ... 7 white keys and 5 black keys. If you play all those notes in a sequence, that is what is called a chromatic scale. You'll want to memorize the names of all these notes. Notice that the sharp (#) and flat (b) notes have 2 names. Also notice that there are no sharp or flat notes between B and C ... and E and F. Understanding how to play a chromatic scale will open up your entire vision of how the guitar fretboard is structured and answer questions many of you may have had for years. All the music you will ever hear is made up of these same 12 notes repeated in higher and lower octaves. Folks will often waste years trying to learn guitar without understanding the musical alphabet. Folks will waste years trying to learn guitar without understanding the musical alphabet. But it's not rocket science. Just look at a piano keyboard.
So how do you play the chromatic scale on the fretboard of the guitar?
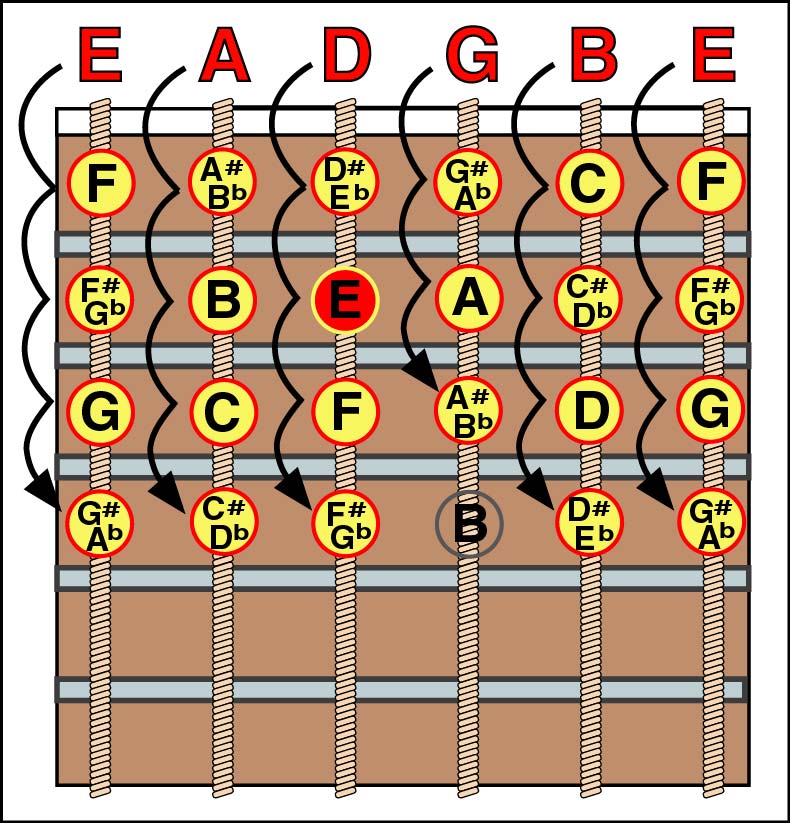
As you probably know, the guitar is tuned E - A - D - G - B - E. Why is it tuned that way? Because you have 4 fingers. Look at your two lowest strings ... E and A. Now look at your musical alphabet. Notice that there are 4 notes in between E and A ... F - F# - G and G#. These are the 4 notes you would play with your 4 consecutive fingers on the lowest 4 frets on your low E string. Just when you run out of fingers, notice that the next note you would be looking for in the alphabet is A. That's the note that your next string (the A string) is tuned to! How cool is that? The guitar is tuned so that when you run out of fingers, it's just time to move on to the next string. What could be more logical?
Notice your next 2 strings ... A and D. Once again there are 4 alphabet notes in between these 2 open strings ... A# - B - C and C#. You play these with your 4 consecutive fingers on the lowest 4 frets on your A string. Just when you run out of fingers, you go on to the open D string.
Now look at the next 2 strings ... D and G. Again we see 4 notes in between these 2 open strings ... D# - E - F and F#. Play these with your 4 fingers. Notice that your second fret is an E note. We started with our open low E string. We are now about halfway across the neck and we have hit E again. If you count, you'll see that we have played 13 notes and have therefore gone 1 octave. You'll see that it's another 12 notes up to your high E string meaning that the pitch distance between your low E and high E strings is actually 2 octaves.
Now things get a little strange. Look at the distance between your next 2 strings ... G and B. Notice there are only 3 alphabet notes in between ... G# - A - A#. These 2 strings are tuned one note closer together because we discovered that it made chord fingering easier on the instrument. Remember, there are physical limitations as to what combinations of notes you can play on the guitar. Making this one compromise in the instrument's tuning allowed us to play a lot more chord shapes. Here, you only play the notes on the first 3 frets of your G string before moving on to the B string ... or you could go up to your pinky on G and then skip the open string on your B string ... go right to the first fret. Either way you avoid playing B twice.
When you get to your top 2 strings ... B and E ... they're back to having 4 notes in between again ... C - C# - D and D#. Play these with your 4 fingers and then switch to your high E string. That high E is 2 octaves above the open low E string note. You can also play 4 notes with your 4 fingers on this high E string ... F - F# - G and G#. That's about 1/3rd of a 3rd octave ... so it's important to note that the span of your hand in any given area of the fret board, from your lowest note on your low E string to the pinky note on your high E string is a distance of 2 and 1/3rd octaves. That's 29 notes in sequence with your hand in one position. Understanding that is true fretboard mastery.
You'll also have to practice going in reverse. Start with your pinky on the high E string. March backwards through your 4 consecutive fingers until you get to your index finger. Now the open string is the last note you play on the string. Then you switch to your pinky on the next lower string and march down again ... the exact opposite of going up the scale. Continue until you finally get back down to your open low E string 2 and 1/3rd octaves later.
Four fingers=four frets. That's the logic of the fretboard.
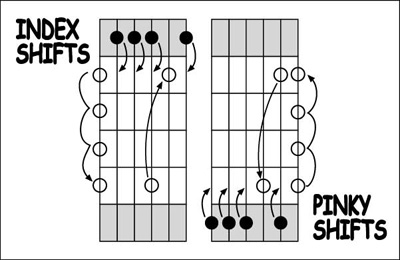
That's how you play the chromatic scale on the lower frets. Playing further up the neck is a little trickier. We said that 4 fingers = 4 frets but notice that you actually play 5 notes on each string ... including the OPEN string. The truth is it requires the control of 5 frets on each string to play a Chromatic Scale. Down at the nut, we had the luxury of using the open string as our 5th fret. Anywhere else on the neck, you can't use the open string, so you have to compensate by learning what are called FINGER SHIFTS. Here, one of your fingers must control 2 frets so that your 4 fingers can control 5 frets. Generally speaking, you use your index finger to shift when going up the scale ... and your pinky when coming back down.
You can use this system anywhere on the neck to play in different keys ... but for now, let's start by putting our index finger on the 5th fret on our low E string. This is an A note and will be the lowest note we will control. Now move up the next 3 frets with your fingers until you get to your pinky on the 8th fret. You've just run out of fingers. Where do you go to get the next higher note in your Chromatic Scale? As the chart below indicates, you reach out with your index finger an extra fret lower (the 4th fret) on your A string (where the black dot is) and play that note. Then you scoot your index finger across the fret to the fret it was originally on (the 5th fret) and pluck that note. You have just played 2 consecutive notes with your index finger. Now continue up the next three frets with your 3 fingers until you hit your pinky again on the 8th fret. Where to next? You reach your index finger out again to the 4th fret ... this time on your D string, and then scoot it back to the 5th fret. Walk the other 3 fingers up to your pinky on the 8th fret again.
Where to now? Again we reach out to the 4th fret on our G string and shift to the 5th ... but here, things are a little different. Remember, your G and B strings are tuned 1 note closer together and this is bound to effect our fingering. It's actually quite simple. You proceed up to your pinky at the 8th fret again ... but now you skip the finger shift and go directly to the 5th fret on your B string as the chart below indicates. Don't shift your index finger. Just walk up until you hit your pinky on the 8th fret. Where to now? You will have to do a shift on your high E string. Reach that ol' index finger to the 4th fret on high E and scoot it up to the 5th fret again ... then proceed up the next 3 frets with your fingers until you max out at your pinky on the 8th fret ... the highest note we can control in this position. We have just played 2 and 1/3rd octaves as we did down at the nut in our previous exercise.
Coming back down the scale, you learn to shift with your pinky. It's not going to like it at first (it is your weakest finger), but with practice, you'll whip it into shape. Don't whimp out on your pinky! You've only got your 4 fingers. You need them all to master the fretboard and control the instrument the way you want to.
We now start with our highest note ... pinky on the 8th fret of your high E string. March down until you reach your index finger on the 5th fret. Where to next? You reach your pinky out an extra fret (9th fret) on your B string and pluck that note. Then you do a PINKY SHIFT as the black dot indicates on the chart below. You scoot your pinky back onto the 8th fret and pluck that note as well. You have just played 2 consecutive notes with your pinky. You then proceed down the B string until you get to the index finger on the 5th fret.
Here we immediately encounter the 2 strings (G and B) that are tuned 1 note closer together ... so your pinky goes directly to the 8th fret on the G string without reaching out that extra fret. No shift required. Walk down that string to your index finger on the 5th fret.
You will have to reach your pinky out to the 9th fret when you move down from the G to the D string and do another pinky shift to the 8th fret. Walk down that string to the 5th fret. Reach your pinky out to the 9th on the A string and pinky shift again. Walk down to the index finger on the 5th fret again. Reach that pinky out one last time to the 9th fret on the low E string and do a pinky shift to the 8th ... and finally walk those fingers down to the index at the 5th. You should be back to the A note that we started on (5th fret, low E string).
It takes 5 frets to play all 12 notes
At the bottom of the neck, you use the open strings as the 5th fret ... but further up the neck you have to master index shifts going up the scale, and pinky shifts coming back down.
Congratulations! You now know how to play all 12 notes for a distance of 2 and 1/3rd octaves anywhere on your fretboard ... and that's real power. You'll come to find that most of the folks around you who claim to play guitar don't know anything about this at all. What that means is, that over the next few weeks, months and years, you're going to blow right by them and leave 'em in the dust. Pretty soon they'll be begging to take lessons from you!
Scotty West, guitar teacher and creator of the Absolutely Understand Guitar Video Lesson Program.